This guide assumes you’ve created a Realm and have configured LoginRocket with your app’s URL. If those steps still need to be done, see the Quickstart Guide (or the Full Start Guide if that process is somehow half-complete).
This is the Ruby on Rails version of this guide, which covers a streamlined integration with Rails. If you’re using Ruby without Rails (or don’t want to use the integration with Rails), see the Ruby Integration Guide.
If you’re not using Ruby, see the standard Integration Guide.
The Quickstart should have left you at the Integration page showing your Secret API key and JWT Secret. If you’re not there now, go to Realm -> Integration.
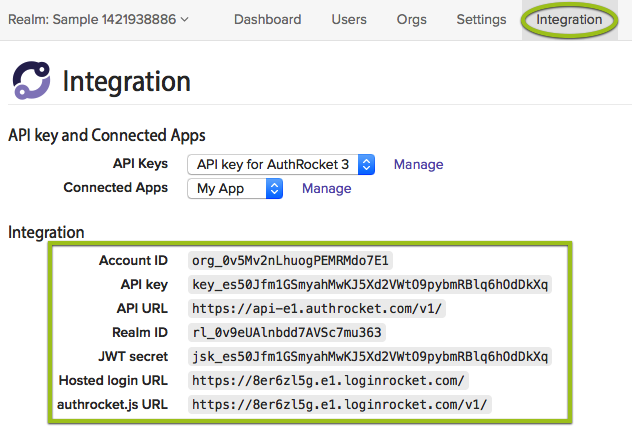
Keep this page open–you’ll need the information here when configuring API access.
Start by adding the gem to your Gemfile:
gem 'authrocket', '~> 2.0', require: 'authrocket/rails'Then run bundle.
Often the simplest way to configure the authrocket gem is to use environment variables. If you are using a hosting environment, such as Heroku, that handles environment variables for you, this is super easy.
Set these variables using the information on the Integration page.
AUTHROCKET_JWT_SECRET=jsk_SAMPLE
# this is the LoginRocket URL:
AUTHROCKET_LOGIN_URL=https://sample.e1.loginrocket.com/
If you also plan to access the AuthRocket API, set these too.
AUTHROCKET_API_KEY=ko_SAMPLE
AUTHROCKET_URL=https://api-e1.authrocket.com/v1/
AUTHROCKET_REALM=rl_SAMPLE
If using foreman for development, simply add the above to your .env.
Be careful: recent versions of foreman no longer handle end-of-line comments or whitespace around the =.
You may also use an initializer or any other method you prefer. Here’s how to set the API credentials directly:
AuthRocket::Api.credentials = {
  jwt_secret: 'jsk_SAMPLE',
  loginrocket_url: 'https://sample.e1.loginrocket.com/',
  api_key: 'ko_SAMPLE',
  url: 'https://api-e1.authrocket.com/v1/',
  realm: 'rl_SAMPLE'
}Store your API credentials in a file that’s ignored by git (or equivalent). Storing them directly in a code file is discouraged.
The last step is to add a before_action command to any/all controllers or actions that should require a login.
# protect the entire app
class ApplicationController < ActionController::Base
  before_action :require_valid_token
end

# protect an entire controller
class ProfilesController < ApplicationController
  before_action :require_valid_token
end

# protect only certain actions
class PostsController < ApplicationController
  before_action :require_valid_token, only: [:create, :edit, :new, :update, :destroy]
endSeveral helpers are automatically available.
Creating login, signup, and logout links:
<%= link_to 'Login', ar_login_url %>
<%= link_to 'Signup', ar_signup_url %>
<%= link_to 'Logout', logout_path %>
Accessing the current session and user:
current_session
# => AuthRocket::Session
current_user
# => AuthRocket::User
If you’ve told AuthRocket to include Membership or Org information in the login token (see Realm -> Settings -> Sessions & JWT), that data is accessible through current_user:
current_user.memberships
current_user.memberships.first.org
current_user.orgs
Using the helpers in a view or layout is pretty familiar.
For example, you might add something like this to layouts/application.html.erb:
<div class="nav-header">
  <% if current_user %>
    Welcome, <%= current_user.name %>! [<%= link_to 'Logout', logout_path %>]
  <% else %>
    <%= link_to 'Login', ar_login_url %> |
    <%= link_to 'Signup', ar_signup_url %>
  <% end %>
</div>After a user logs in (or signs up), they are returned to either the last page they tried to access (if known) or to '/' (the default path).
This default path may be changed using an initializer.
Create/edit config/initializers/authrocket.rb and add this:
AuthRocket::Api.default_login_path = '/manage'Other customization options exist to disable the default routes (/login and /logout), override the login controller, and more. See the authrocket gem docs.
We’ve made a complete example Rails app available on GitHub. It covers everything above plus a few other pieces to tie everything together.
Logins should now be working with your app.
If you enabled signups via LoginRocket, those are now working too. When a new user registers, we create their user profile and then log them in. No extra code required!
From here we suggest the following:
Questions? Find a Typo? Get in touch.