This guide assumes you’ve created a Realm and have configured LoginRocket with your app’s URL. If those steps still need to be done, see the Quickstart Guide (or the Full Start Guide if that process is somehow half-complete).
This is the PHP version of this guide. If you’re not using PHP, see the standard Integration Guide.
The Quickstart should have left you at the Integration page showing your Secret API key. If you’re not there now, go to Realm -> Integration.
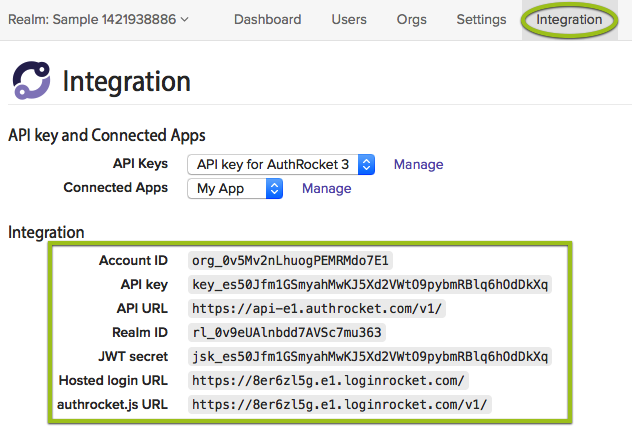
Keep this page open–you’ll need the information here when configuring API access.
Use composer to add AuthRocket to your project:
php composer.phar require authrocket/authrocket=^1Often the simplest way to configure the authrocket library is to use environment variables. If you are using a hosting environment, such as Heroku, that handles environment variables for you, this is super easy.
Set these variables using the information on the Integration page.
AUTHROCKET_API_KEY=ko_SAMPLE
AUTHROCKET_URL=https://api-e1.authrocket.com/v1/
AUTHROCKET_REALM=rl_SAMPLE
AUTHROCKET_JWT_SECRET=jsk_SAMPLE
Then simply initialize the client:
$client = \AuthRocket\AuthRocket::autoConfigure();Basic apps usually use only a single realm. If you’re using multiple realms, see PHP Client Basics for how to build the client.
You may also initialize the client any other way you prefer. Here’s how to set the API credentials directly:
$client = new \AuthRocket\AuthRocket([
  'apiKey'    => 'ko_SAMPLE',
  'url'       => 'https://api-e1.authrocket.com/v1',
  'realm'     => 'rl_SAMPLE',
  'jwtSecret' => 'jsk_SAMPLE'
]);Store your API credentials in a file that’s ignored by git (or equivalent). Storing them directly in a code file is discouraged.
As part of the quickstart, we’ve setup LoginRocket, which will handle logins (and likely signups) for you. Now your app needs a way to verify that login as legitimate and then to initiate a session for the user.
Exactly where to do this will depend what PHP framework you’re using (or however else your app is organized). If you’re using an MVC-style framework, add a Login controller and Login action. Otherwise, you might need to add a login.php page or something else to receive the login.
We previously configured a Login handler URL when setting up the Connected App. In our example, that Login handler URL was:
http://localhost:3000/login
Upon a successful login, a new login token will be generated and appended to that URL. The result is that the user’s browser will be redirected to:
http://localhost:3000/login?token=47ng5bYEc8s...l3XYbUnMPHf
The URL is just the configured Login handler URL plus a standard query parameter, ?token=47ng5bYEc8s...l3XYbUnMPHf, appended to the end. Pretty simple.
Based on this example configuration, your app needs to respond at /login and to verify the token with something like this:
function login() {
  // grab the login token
  $token = $_GET['token'];

  try {
    // use the previously configured AuthRocket client to verify the token:
    $session = $client->sessions()->find($token);

    // setup the user's session
    $_SESSION['userId'] = $session->user_id;
    $_SESSION['userName'] = $session->user['name'];

    // optional: save the session token
    // $_SESSION['sessionToken'] = $token;

    // good to go
    printf("Login succeeded.\n");
    // TODO: redirect the user to the logged in area

  } catch (\AuthRocket\Error => $e) {
    // something failed
    printf("Login failed.\n");
    // TODO: redirect the user back to the login URL
  }
}
See also the Get a Session API docs.
Here we’re storing the user’s ID and name in the session. This allows us to later avoid making API calls to AuthRocket for every page by caching the data we need directly in the session. When there’s a particular need for up-to-date data on a certain page (such as a profile update page), then use the stored userId to load a full copy of the User record using the Get a User API call.
If you wish to check the session for every page (which makes it possible to detect expired sessions and logouts), then store the token in your session too (as commented out above).
The above example relies on your Realm using managed sessions (which is true by default). If you wish to switch to unmanaged sessions, or speed up your app, you can use JWT validation instead:
function login() {
  // grab the login token
  $token = $_GET['token'];

  // use the previously configured AuthRocket client to verify the token:
  $session = $client->sessions()->fromToken($token);

  if ($session) {
    // setup the user's session
    $_SESSION['userId'] = $session->user_id;
    $_SESSION['userName'] = $session->user['name'];

    // good to go
    printf("Login succeeded.\n");
    // TODO: redirect the user to the logged in area

  } else {
    // something failed
    printf("Login failed.\n");
    // TODO: redirect the user back to the login URL
  }
}
JWT validation has the benefit of not requiring an API call to AuthRocket, using a digital signature instead. See JWT login tokens and Session Concepts for more details.
Once the above is complete, logins will be working with your app.
If you enabled signups via LoginRocket, those will now be working too. When a new user registers, we create their user profile and then log them in. No extra code required!
From here we suggest the following:
Questions? Find a Typo? Get in touch.