This guide assumes you’ve created a Realm and have configured LoginRocket with your app’s URL. If those steps still need to be done, see the Quickstart Guide (or the Full Start Guide if that process is somehow half-complete).
This is the language-agnostic version of this guide. There are also language-specific versions:
The Quickstart should have left you at the Integration page showing your Secret API key. If you’re not there now, go to Realm -> Integration.
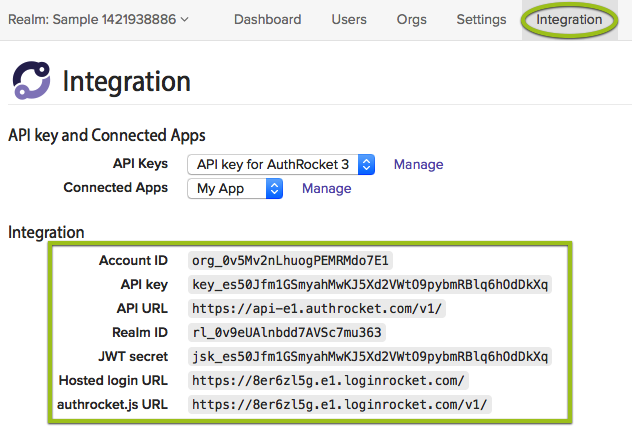
Keep this page open–you’ll need the information here when configuring API access.
AuthRocket uses HTTP headers to transmit your API key and other variables. Full details are in the API overview, but we’ll cover the basics here.
These are the headers you’ll want to include. The values for them come from the Integration page we just looked at.
X-Authrocket-Api-Key: ko_SAMPLE
X-Authrocket-Realm: rl_SAMPLE
Basic apps usually have only a single realm. For them, it’s convenient to set a global realm ID by sending the X-Authrocket-Realm header as shown above. However, if your app will use two or more realms, we strongly discourage setting a global realm ID. Instead, send a realm_id query parameter with each API request, or include it with the POST data.
Accept: application/json
Content-type: application/json
AuthRocket can provision services at different URL endpoints. The Integration page above tells you what the correct API endpoint is for your account.
Additionally, it’s often helpful to assign the hosted logins URL to a constant in your app.
Example URLs:
  API endpoint:  https://api-e1.authrocket.com/v1/
  Hosted logins: https://abcdefgh.e1.loginrocket.com/
As part of the quickstart, we’ve setup LoginRocket, which will handle logins (and likely signups) for you. Upon a successful login, your app needs a way to verify that login as legitimate and then to initiate a session for the user.
Your app will be sent a token, looking something like 47ng5bYEc8s...l3XYbUnMPHf.
This will be sent to the Login handler URL we configured above when setting up the Connected App. Let’s return to our previous example with this Login handler URL:
http://localhost:3000/login
Upon a successful login, a new login token will be generated and the user’s browser will be redirected to:
http://localhost:3000/login?token=47ng5bYEc8s...l3XYbUnMPHf
The URL is just the configured Login handler URL plus a standard query parameter, ?token=47ng5bYEc8s...l3XYbUnMPHf, appended to the end. Pretty simple.
Based on this example configuration, your app needs to respond at /login and to verify the token with something like this:
# grab the login token
token = request.get_param('token')

# make an API call to AuthRocket:
ar_sess = http_request('GET', 'https://api-e1.authrocket.com/v1/sessions/' + token, ar_headers)

# valid tokens return with an HTTP Status: 200
if (ar_sess.status == 200) {
  # setup the user's session
  session['user_id'] = ar_sess['user_id']
  # the returned event record also includes an embedded copy of the user record
  session['user_name'] = ar_sess['user']['name']
  # good to go!
  redirect user to logged-in area
} else {
  # something failed
  redirect user back to login URL
}
See also the Get a Session API docs.
Here we’re storing the user’s ID and name in the session, not the login token. This avoids making an API call to AuthRocket for every page by effectively caching the data we need directly in the session. When there’s a particular need for up-to-date data on a certain page (such as a profile update page), then use the stored user_id to load a full copy of the User record using the Get a User API call.
If you wish to check the session for every page (which makes it possible to detect expired sessions and logouts), then store the token in your session too.
The above example relies on the Realm using managed sessions (which is true by default). If you wish to switch to unmanaged sessions, or speed up your app, you can use JWT validation instead:
# grab the login token
token = request.get_param('token')

# validate the token using the Realm secret (from the Integration page)
ar_sess = JWT.verify(token, 'realm-jwt-secret')

# if this is a valid session
if ar_sess {
  # the verified token also includes select user information for setting up the user's session
  session['user_id'] = ar_sess['uid']
  session['user_name'] = ar_sess['n']
  # good to go!
  redirect user to logged-in area
} else {
  # something failed
  redirect user back to login URL
}
JWT validation has the benefit of not requiring an API call back to AuthRocket, using a digital signature instead. See JWT login tokens for more details and a list of libraries for various languages. Also see Session Concepts.
Once the above is complete, logins will be working with your app.
If you enabled signups via LoginRocket, those will now be working too. When a new user registers, we create their user profile and then log them in. No extra code required!
From here we suggest the following:
Questions? Find a Typo? Get in touch.